Just few days back, I write a post to turn your windows laptop into wifi hotspot using a software mhotspot. Mhotspot is small software and very easy to use, there is another great way to create wifi hotspot on windows 7 and windows8. Actually, you do not need help of any third party wifi hotspot software in order to create wifi hotspot. There is a built in feature in both windows 7 and windows 8(should be working on windows 8.1) to create hotspot. You just need to write few commands in command prompt.
1. Open the Command prompt as Administrator (Right click and select Run as administrator).You can also open it by pressing Window Key + X and choosing Command Prompt(Admin).
4. Similar way, you can create a batch file to stop the hotspot.This tutorial might feels you long because I explained in quite detail. However, It will not take more than two minutes to create wifi hotspot using this method.
1. Open the Command prompt as Administrator (Right click and select Run as administrator).You can also open it by pressing Window Key + X and choosing Command Prompt(Admin).
2. Type the following command in the command prompt and press Enter.
netsh wlan set hostednetwork mode=allow ssid=tipstrickshackery key=wifipasswordHere ssid is the name of your hotspot and key is password of your hotspot.Choose both of these according to you.
3. Next,type the following command and hit enter.
netsh wlan start hostednetwork4. Now go to Network And Sharing center and You can see your newly created wifi hotspot connection.But, as you can see, it has no network access.We need to fix this by enabling sharing of internet connection for your working Internet connection.In my case, it is wifi connection,but it can be Ethernet or any other working internet connection. 


5. To enable sharing, Click on your default Internet connection and selectProperties.Under the Sharing tab, tick the box saying – Allow other network users to connect through this computer’s Internet connection.Under the Home networking Connection, select the connection which is showing as your hotspot connection.(In my case, it is Local Area connection *12 ) .


6. Your Wifi hotspot is created and Internet sharing is enabled. You can check in the Network and Sharing center that your wifi hotspot now has Internet Access.


6. Your Wifi hotspot is created and Internet sharing is enabled. You can check in the Network and Sharing center that your wifi hotspot now has Internet Access.

7. Now Connect any wifi enabled device to this hotspot using the password you choose while typing the command.
8. In order to stop the Wifi hotspot, Just type the following command in thecommand prompt(as Administrator).
netsh wlan stop hostednetworkIt might came to your mind that remembering these commands is not easy.Also typing them again again is tedious task.This also has a solution.
2. Select Save As and save the file as Batch type. Name the file anything you want but make its extension .bat .Also select All Files in Save as Type. Save it on the desktop.
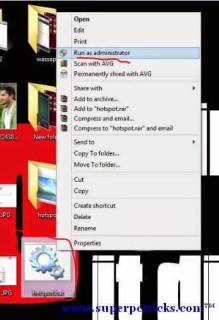
3. Your batch file is created.Now whenever you need to start hotspot, just run this file with admin privileges.

3. Your batch file is created.Now whenever you need to start hotspot, just run this file with admin privileges.

4. Similar way, you can create a batch file to stop the hotspot.This tutorial might feels you long because I explained in quite detail. However, It will not take more than two minutes to create wifi hotspot using this method.
Facing any problem, let me know in the comment section.


0 Comments