You start your PC and notice that after the Manufacturer logo, instead of normal Windows log in screen, a Recovery screen shows up with a message – Your PC needs to be repaired. The boot configuration data for your PC is missing or contains errors.Below this, there is a error code like 0xc000000f, 0xc000014C, 0xc0000225, 0x0000098, 0xc0000034 etc. Each of these error codes are related to Boot Configuration file BCD. This error shows up because the BCD file on your system is missing some required information or it has became corrupted. Due to this,Windows cannot boot normally. This usually happens when you upgrade Windows, that is, you move from windows 7,8,8.1 to Windows 10. If you are seeing the above error on your Windows 7/8/10 PC, then this post might be very helpful to you.

The boot configuration data for your PC is missing – Fix
In order to fix the boot configuration data file and make your system boot normally, you need installation media like Windows installation DISC or Bootable Windows USB drive. If you do not have Windows installation disc or USB drive, you can create one by downloading ISO image from the Microsoft’s website and burning it on USB drive with the help of a working PC.
- Once you have created a Windows bootable USB drive (same version of Windows that you have on your computer), connect it to your computer and restart it.
- Keep pressing F10 key until you see the Boot menu screen. Choose the USB drive that contains the installation files. Select the language and click Next.
- Below the Install Now Button, there is a Repair your computer Link. Click it and you will see the Troubleshoot option. Select Troubleshoot and you will see two options- Reset this PC and Advanced Options.


- Here, you can choose Reset this PC and it is highly likely that the problem will solved, but you will loose your all files and data(on all drives). So, we will try to fix the error with the help of command prompt.

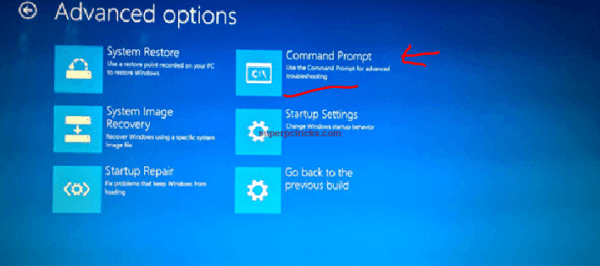
- Click on Advanced Options and select Command Prompt. Now type the following commands one by one and hit Enter after each.
1. diskpart
2. sel disk 0
3. list vol

- Depending upon the number of your hard drive partitions, you will see a number of volumes with their letters and file system. Look for the volume number with file system FAT32. There will be only one volume with file system FAT32. Next, type the following commands:
4. sel vol 9 (Replace the number 9 with your own volume number having file system FAT32).
5. assign letter=a:
6. exit

- After typing the exit command and pressing enter, a message will be shown – Leaving DiskPart. Now, execute the following commands:
7. cd /d a:\EFI\Microsoft\Boot\
8. bootrec /fixboot (You should see the message-operation completed successfully.)
9. ren BCD BCD.backup (Ignore this warning- A duplicate file name exists.)
10. bcdboot c:\Windows /l en-us /s a: /f ALL
- If everything goes right, after the execution of the last command, you should see a message – Boot files successfully created.

Close the Command Prompt and shut down your system. Start it again and this time your PC will boot normally without any errors. Make sure that you execute the commands exactly as above and closely notice the single space between the characters wherever applicable . If you face any problem in the above guide, feel free to comment below.


0 Comments